pencil roll tutorial!
Drumroll please
:::::::::::::::::::::::::::::
(doesn’t that look like a drumroll?)
Here are the long-awaited directions for the pencil roll!
Go to Kat’s website and you will find step-by-step instructions for our 500 Pencil Roll Project for Katie’s children. After hours of brainstorming, reading other people’s tutorials, and basically making myself crazy, we created this easy, step-by-step guide that anyone (even me!) can follow. I am telling you, if I can sew these, truly, anyone can!
We are not doing them with the different colored pockets for each pencil – they are WAY cute, but also time consuming, and we are trying to make these as quick as possible. These ones are made with one piece of cotton fabric for the outside, a different piece for the inside, and flannel hidden on the inside to give it some strength, or you can use interfacing if you have that.
Each person can sew from cotton fabric they have on hand or if you are willing to purchase some that is great as well. If you are willing to donate money to the cause for others to buy fabric they don’t have, that is wonderful as well…or donate fabric!
I have about 20 yards of fabric I bought at Home Fabrics $1/yard sale, so if you need some, let me know.
If you want to do them with wool felt or a wool felt blend of 35% wool/65% rayon or 20% wool/80% rayon, you can and I will give you those directions below. DO NOT USE craft felt found in stores!!! It is garbage and will not hold up to even a week of handling. You can buy the wool felt at prairiepointjunction.com and get a 20% off coupon by entering here. The discount button is over on the right hand side of the page about 1/2 way down. You can also get it at Joann.com and use a 50% off coupon or 40% off coupon. The 20/80 blend is $7.99 and the 35/65 blend is $9.99, so with the coupons, it would be a great price! It is not available here in our local stores, but may be in the larger stores, just call and ask if you are interested. Caution though, if you do not know much about wool felt, call me before you purchase it so I can help you know if it is acrylic/polyester/eco-felt garbage or if it is the good stuff.
Now, you may be wondering why using wool felt is easier than using your leftover cotton scraps. If so, let me explain. Wool does not fray and does not need to be sewn right sides together/wrong sides out and then turned. You just sew right on to your piece of felt!
Wool felt tutorial:
Your finished product will be 10.5″ wide x 8″ tall.
Cut a piece of wool felt 11″ x 17″ and position it so the 11″ side is running side to side and the 17″ side is running top to bottom.
At the top, measure in 1.25″ and 5″ down the side and cut.
Fold up the bottom 4″ and pin in place.
Lay a thin no-damage ponytail holder on your table and hold it flat. Wrap a thread around it 1/2″ from its end.
Insert the 1/2″ side of the ponytail holder at the almost 4″ mark of your felt (where you folded up the bottom) and pin in place just below the top of that pocket. The big loop of ponytail holder should be hanging out of the fabric.
Top stitch at 1/4″ all the way around the wool felt, making sure to back stitch over the ponytail holder.
Measure and mark 7/8″ pockets on the part you folded up.
Sew pockets going a titch past the top of them so the stress point isn’t right at the top of the pocket and back stitch at both ends.
At the spot where the flap starts, fold it down and top stitch at 1/8″.
Put some tester pencils in and roll it up so you can figure out button placement for where the ponytail holder will attach. Mark where a button should go. Unroll, take your tester pencils out. and sew a big button in place.
If you want to make it super-cute, use pinking shears to cut the edges, making sure to not cut through the elastic.
Voila! You are done…now isn’t that easy peasy!
You may choose to use two piece of wool felt to make it more colorful and add to its strength. If so, just do everything identical, except insert the ponytail holder in between the two pieces of felt.
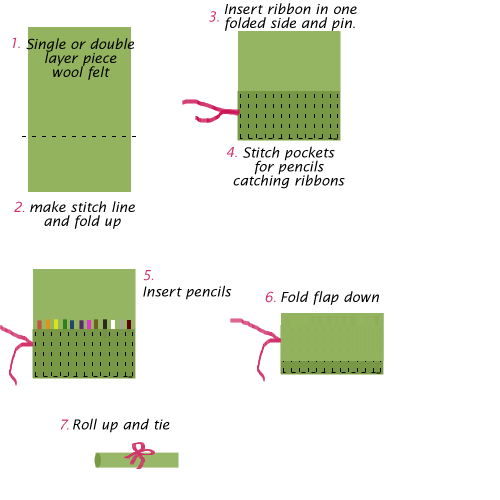
These are some pictorial instructions, but they don’t have the “cut the flap at an angle” step, and they use a ribbon instead of the ponytail holder/button attachment. The ribbon attachment is easy for adults, but not so easy for little children to wrap it around and tie, so we are using the button method. It also doesn’t have the top stitching, so make sure you do that. As soon as I make one out of felt I will post pictures, but it will probably take me a day or two to get to that.
Now you have everything you need to get to work. Thank you so much for your willingness to help and please, please, spread the word and enlist the women in your life to sew with you! Right now, we are at 21 women, so that means we each need to do 24 rolls to make it to 500. As word spreads, the per person roll can decrease…so step out on a limb and encourage others to sew with you.
Also, there has been some confusion about the pencils. Amazima has a lot of colored pencils and we do not need to provide those. We are doing the sewing and they are gathering the pencils.
If you have any questions, let me know at tracy@wetoatmealkisses.com.

 I'm Tracy, a mama with big dreams, crazy ideas, loads of laughter, an insatiable desire to learn, and enormous piles of laundry.


We are up to 26 seamstresses!! Yeah for us! Keep spreading the word!
Hi Tracy,
We (my daughter and I) would like to contribute. We are in Alaska and at the moment our goal is 15. She is doing it for a young women’s value project. we know you need it by the end of Nov; is there anything else we need to know?
Thanks, Michelle
At this late date,it is too late for me to participate (APO is SLOW at the best of times. :) but do you have another project planned for your next one? :) This one sounds like a great activity. k. hartvigsen